

How to make “Sun Prints” or Cyanotypes at Home
- Baylee Roberson
- Apr 15, 2025
- 9 min read
Cyanotypes may seem intimidating with their name, but they are actually quite forgiving! Occasionally referred to as sun prints- these stunning blue prints can be made by harnessing the power of sunlight.
This unique combination of art and science can be a great way to spend a sunny day with your family or friends. You don’t need to know how to draw or need any fancy equipment to be able to make a beautiful piece of art that is one-of-a-kind and completely unique to you.

What are Cyanotypes?
Cyanotypes are a cameraless photography method that creates images using a photosensitive chemical solution on paper or fabric. This scientific process was invented in the 1840s, and has been used historically for blueprints, botanical classification, and more.
Photosensitive means something is sensitive to light, specifically UV light from the sun (thus- sunprints!). When the UV light interacts with the chemicals, it will turn your paper bright blue. The white areas of the photo are made by blocking light, you can use plants, found objects, or photo transparencies to do this. For oil painters and Bob Ross fans, you may be familiar with the color Prussian Blue. This is the chemical process that produces that pigment.
Light has the power to transform our world, and ourselves. The objects you use to make your prints create an image by blocking the light. I invite you to think about how light has transformed your life, and use that to inspire your prints.
What You'll Need
Most Important: Cyanotype Chemicals
My go to is the Jacquard Parts A & B. This two-part solution is only $13 dollars, and will last you roughly 50-60 prints on 8x10in paper. You can also order directly from Jacquard’s website, which has a wealth of resources and information about cyanotypes in addition to selling materials!
Alternative to Two Part Chemical Mix: Pretreated Cyanotype Paper
This alternative is a great way to explore cyanotypes without dealing with the chemical mixture directly, this is also a great way to introduce the concept to young children.
Gloves
The chemicals that make up this two-part solution are non-toxic, as long as you wear proper safety equipment, such as gloves, and take care to avoid getting any of the solution in your eyes or mouth, you are perfectly fine.
Either disposable nitrile/vinyl gloves or reusable dishwashing gloves work. If you don’t use gloves, your hands may stain!
Paper or Fabric
It is important to choose paper that is absorbent and can handle liquid, such as watercolor or mixed media paper.
You can also print on fabric! Fibers used must be natural, so no acrylic or polyester. Stick to cotton, linen, wool, etc.
Brushes
A large brush is handy for coating your paper with the solution quickly and evenly.Experiment with having your application brushstrokes be visible, it can make for a unique print texture!
Materials to make an Image! Found Objects, Photo Transparencies
This is a material that you can truly make your own. Almost anything can be used to make a print!
A short list of ideas: Plants, Feathers, Lace, Buttons, Trash, Plastic, Paper Cutouts, etc.
On a beautiful day where the sunshine calls you outside, take a walk around your neighborhood and pick up a few things that call to you, leaves, plants, maybe even trash!
Glass or Acrylic
This is used to keep your materials for printing, found objects, etc. close to your paper. Putting acrylic over your print is integral to keeping your materials in the same place as you move your print outside for exposure.
Running Water/Rinsing Station
An important step of making cyanotypes is rinsing your prints after exposure, this removes all the chemical solution from your print and stops it from processing/developing. At home, rinsing prints under the sink works great! You can also fill up a plastic tub with water to rinse prints, just change out the water if it becomes cloudy.
Optional Supplies
UV Lamp:
If you want to create cyanotypes on a rainy day, you still can! A UV lamp is a good alternative to exposing your print with UV light from the sun. Exposure times may take longer with a UV lamp and may take some trial and error. If you ever do your own nails at home and have a nail light, those work!
Clipboard:
It can be handy to have a clipboard to build your print on, this will make it easier to transport it between inside and outside and will keep your acrylic sheet pinched on top.
Beyond Paper:
Another great thing about cyanotypes is that they can be used on a variety of surfaces!
You can create cyanotypes on wood, tile, glass, shells, fabrics, and more! Almost Anything that is absorbent, porous, and when using fabrics- natural fiber, can be used to create a cyanotype print.
Step by Step Instructions
Prepare Your Cyanotype Solution (24 hours in advance)
Activate the cyanotype 2-part solution at least 24 hours prior to printing. The chemicals come in a powder form inside the bottles, so start by filling the bottles with water, giving them a good shake, and letting them chill for a day. Store the bottles in a cool dry place.
If stored properly (and not combined together), these two bottles of A & B will last you a while, even if you don’t make prints for a few months.
Prepare Your Station
When working with cyanotypes, prep your prints indoors, away from natural light. The room doesn’t need to be pitch-black—just shaded enough to prevent accidental exposure.
Preparation Tips:
Lay down a tarp or drop cloth over your work surface to prevent any staining from the cyanotypes. If you do get cyanotype solution on a hard surface, bleach can be used to remove the blue staining.
Prepare an area for your prints to dry. You can use a drying rack, clothespins & twine, or towels over a table or ground. Make sure your area for prints to dry is inside away from UV exposure.
Fill a sink, tub, or container with water. Have it ready beforehand so there’s no delay when rinsing and stabilizing your prints after exposure.
Make sure you wear gloves! The cyanotype chemicals are non-toxic, but it is best to minimize contact with your skin as it could be a mild skin irritant. You may also want to wear an apron or clothes you don’t mind giving some extra blue flair!
Combine Parts A & B of Your Cyanotype Solution
Your cyanotype solution only becomes active when parts A and B are mixed in equal parts (1:1 ratio), which lets the chemistry do its thing.
You’ll need two containers: one for measuring each part (a measuring cup or small cup), and another for mixing (like a recycled yogurt cup or glass jar). For example, when I do a test print, I’ll use the bottle cap to measure and mix in a container wide enough for my brush, just definitely not one of my favorite kitchen tools.
Only mix what you need and mix thoroughly! Start small to conserve your solution. You can always make more, but once combined, you’ll want to use it ASAP for the best results.
Saturate Your Paper or Fabric
Make sure you are doing this step in our ‘darkroom’ area we prepared earlier.
Take your brush, dip it in the prepared solution, and saturate your paper (or whatever material you intend to print on). You don’t need to soak it, but make sure you have even brushstrokes over the entirety of your paper. At this stage, it will be a yellowish-green color.
Let your paper soak up the solution and dry before moving onto the next step, this should only take a few minutes with thick watercolor paper.
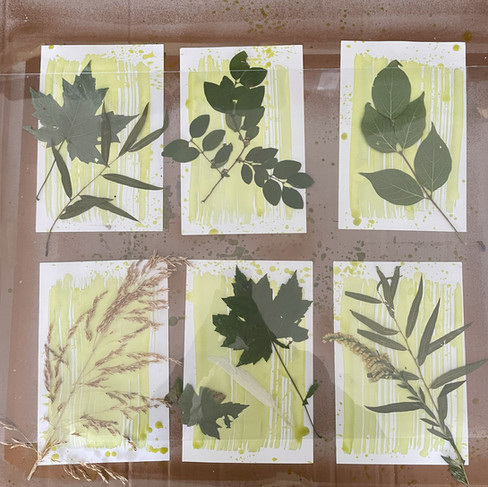
Create Your Print with Your Print Materials!
This step is where you can let your creativity flow! Take some time experimenting with different objects and layouts of materials.
The image will be the result of the shadows of the objects you’ve chosen.


If you’re using a photo transparency, the black of the image is your ‘shadow’ and anything in the shadow will turn white, while the areas that the sun touches will turn blue.
Need inspiration? Try one of these when picking your sun print objects:
Use shapes that reflect how you’re feeling today.
Use only natural items you find on a short walk or outside your window.
Choose three small items that tell a story when combined.
Choose items that remind you of someone you care about.
Pick objects that represent something you’ve overcome.
Create a scene that shows your “happy place.”
Secure Your Print
Once you are happy with your layout of objects or your photo transparency, it’s time to make sure it doesn’t go anywhere! You want your objects to be as close to the paper as possible, this will give you the clearest image.
To do this, I recommend finding a sheet of glass or acrylic to press over top of your image, especially when doing prints with plants or lots of small pieces that may blow away or move with wind. This acrylic sheet will keep everything from moving around as you get ready to take your prints outside for exposure!
Expose Your Print
After you are happy with your layout and have your acrylic on top to cover it, you are ready to expose your print to sunlight!


Prints After Exposure
Be prepared to experience some trial and error when exposing your prints. Expose times can vary depending on the time of day, cloud cover, and other factors. Exposure times can vary from 5 minutes on a bright sunny day to 30 minutes on an overcast day.
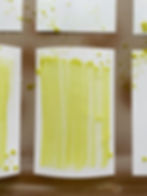
Your prints should be a yellowish green color, and as you expose them to sunlight, the paper turn to a brown shade.
You may want to make a few test prints with different exposure times, don’t be afraid to experiment!

Top Left: Underexposed, 5 minutes in cloudy conditions
Top Right: Good Exposure, 30 minutes in cloudy conditions
Bottom Left: Slightly Overexposed, 40 minutes in cloudy conditions
Bottom Right: Overexposed, 50 minutes in cloudy conditions
With cyanotypes, overexposure is preferred to underexposure. It is better to ‘let it cook’ for longer than you think than to wash your hard work down the drain!
It can be tempting to touch or mess with your work while it is being exposed, but it is important to leave your print as undisturbed as possible. A watched pot never boils!
Rinse and Stabilize Your Print
After exposure, we will take our prints inside to our ‘darkroom’ and remove our objects that we used to print with, set them aside. Now you should see the ghost of your print.
Our next step is to rinse our prints under water. Rinsing the prints stops the print from processing any further and will begin to develop into our blue color! Continuously rinse your print until you see it change color completely.
Take care not to scrub your print with your hands, as this can disrupt your image, simply let the water do the work for you.
If the solution appears to stain your tub or sink, it will wipe off easily, and if any staining remains, cleaning with bleach will remove any lingering residue.
Hang or Lay Your Print to Dry
After you’ve completed rinsing, it’s time to set your prints up to dry. If you are using a clothesline setup, just clip your prints in the corners and let them drip and dry. Make sure your drying station is away from the sunlight.

ENJOY YOUR BEAUTIFUL ART
Congratulations! You have now completed a unique cyanotype print!
Take a moment to pat yourself on the back and take pride in your artwork. You successfully tried something new.
After drying, these cyanotype prints are considered archival, which means they should last a lifetime! If you leave them displayed in or near a window, they may fade some over time, but overall they will retain their image.
If you are printing on fabric, specifically a wearable item like a t-shirt or blanket, washing with regular detergent will fade your print. Use a mild hand soap to clean your fabric prints, if needed.


The Power of Light: Meditation Exercise
Optional exercise during Step 7
While your prints are exposing, take time to enjoy being present in nature. 10-15 minutes is plenty of time for a moment of mindfulness.
While you’re outside waiting, find a comfortable spot and sit with your feet on the ground. Close your eyes and begin taking slow, deep breaths. Relax your body. What do you feel?
Pay attention to the way the sun feels on your skin and how the wind feels in your hair. If you’re willing- Kick your shoes off and feel the grass beneath you!
Ground yourself in nature. If you get distracted or find yourself worrying- try to focus on the sunlight and the sounds of nature around you. Maybe you hear birds, or rustling leaves.
As you feel the sunshine on your body, imagine light pouring into you, lifting you up, energizing and empowering you.
Take a moment to express gratitude to the sun. Think about your favorite thing the sun does for us.
Thank you Sun, for helping grow the food we eat. Thank you Sun, for giving us nice tans in the summer. Thank you Sun, for giving us life.
Enjoy this small moment of sunshine, and take in all of its positivity and shine with you as you open your eyes.
After you have taken time to come back to your present self, your print should have finished exposure, and you are ready to begin the next step!
Come Make Sun Prints with WAV at COSI SciFest!
Want to try making cyanotypes in a fun, hands-on, community setting? Join We Amplify Voices on May 2nd from 3:00–6:00 PM for a free, all-ages event as part of the #COSISciFest!
We'll provide all the materials and guide you through the process—while diving deeper into the fascinating science behind sun prints. This creative project is rooted in our mission of healing through creative expression, and we’d love to share it with you.
Come as you are, and don’t forget to RSVP!